These days you can record great on-camera audio on many cameras. But there are lots of reasons to still record audio separately even if it’s just a backup. Today I’ll be discussing workflows that only use separate audio recording; the classic double system film workflow.
Start by finding all the visual slates. This is pretty easy. Open the clip, scan through the beginning until you see the clapper hit. If the 2nd AC has read my post on slating, then it will be simple.
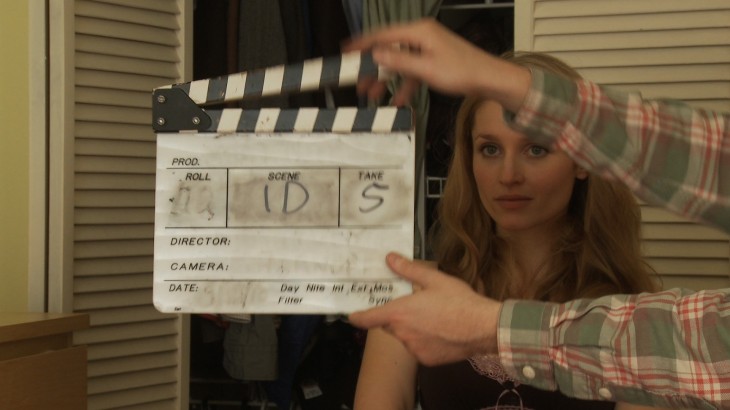 Not Yet!
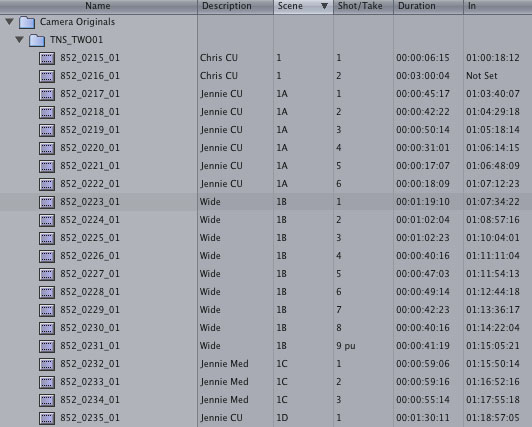
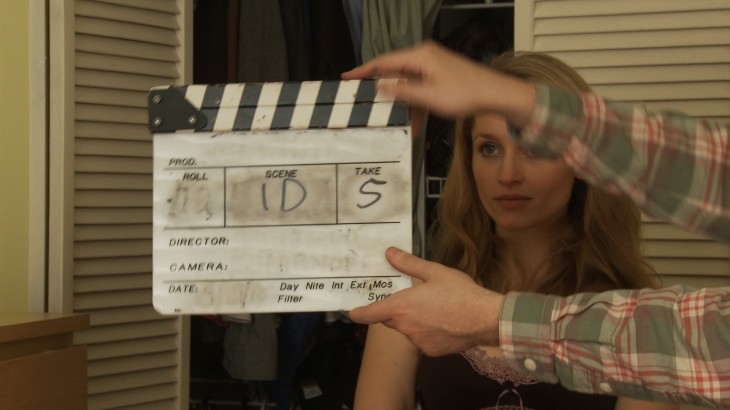 There’s the slate. Mark an in point (“i” on the keyboard) for most slates, or an out point (“o” on the keyboard) if it’s a tail slate. While you’re at it, fill in some metadata. When you’re at this frame you can easily see the Scene and Take number, so fill those in in the appropriate columns of the bin. A brief description will be very helpful too.
Once you’ve marked all the visual slates and filled in the metadata, move on to the audio. FCP makes this really easy by displaying the waveform in the viewer. Slates are pretty obvious.
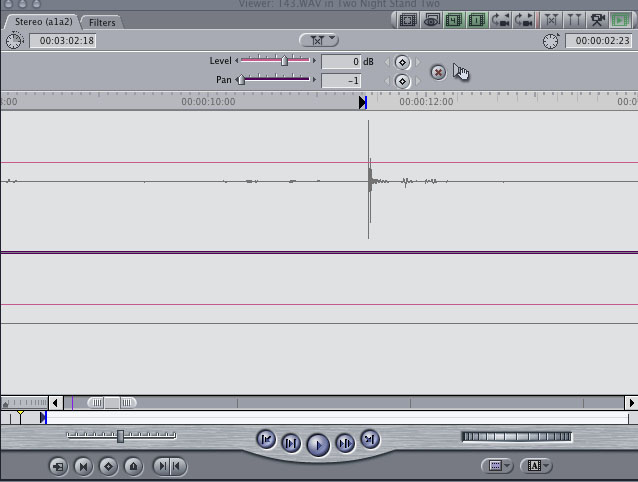
Mark the first frame of the slate (the sound lasts for a couple frames) with an in point. If it’s a tail slate, mark the first frame with an out point. Fill in the appropriate metadata. Usually you’ll just need Scene and Shot/Take, which the 2nd AC should say clearly right before the marker.
(UPDATE: This part does not appear to work in FCP 7) Now, most tapeless cameras include at least two audio tracks in their files by default. P2 cameras seem to go with 4 as a general habit. This makes things nice and easy when you’re using the on-camera audio. But, for double system audio those tracks can get in the way. If you want to get rid of those extraneous audio tracks, select all of the video clips you plan to sync up and make them offline by choosing “Modify/Make Offline…” from the menu or hitting shift+D on the keyboard. A dialog box will pop up. This is important:
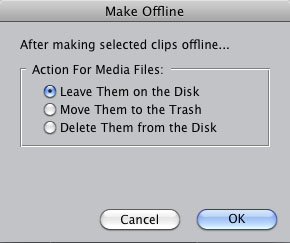
DO NOT DELETE OR MOVE THEM TO THE TRASH!!!! Leave Them on the Disk. All we’re doing here is breaking the link between the clips in the bin and the media file on disk. We’re going to need these files later if we want to edit with them. Hit OK and you’ll have a bin full of offline clips:
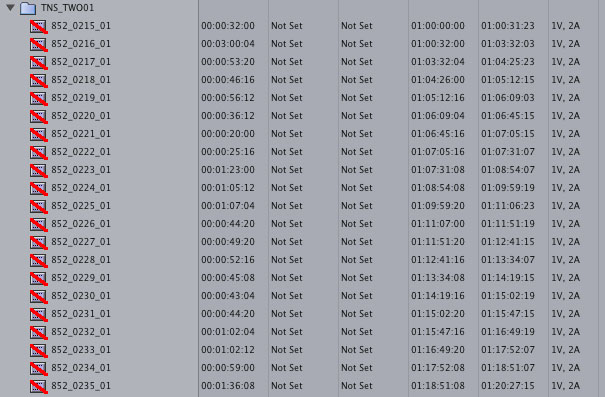
Notice in the last row (Tracks) we have “1V, 2A” listed for all the clips. We want to only see “1V” because that’s all we want to work with. Select the clips again and choose “Modify/Clip Settings…” from the menu. Uncheck the “Audio” check box like this:
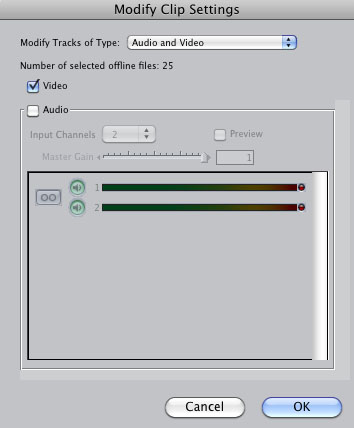
Hit OK and you’ll see that the “2A” has disappeared from all our clips.
Now, the clips should still be selected, so just choose “File/Reconnect Media…” and Locate the media files on disk. You’ll get a warning about a File Attribute Mismatch
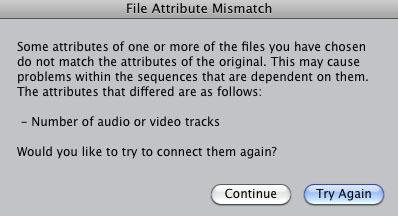
but you already knew that. We changed the number of tracks on purpose, right? So click Continue and then Connect. The files will reconnect and you should see this:
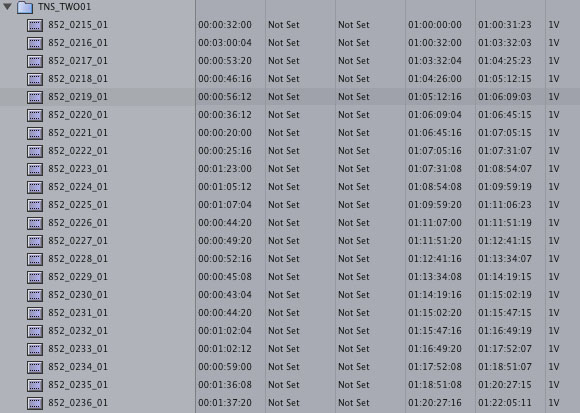
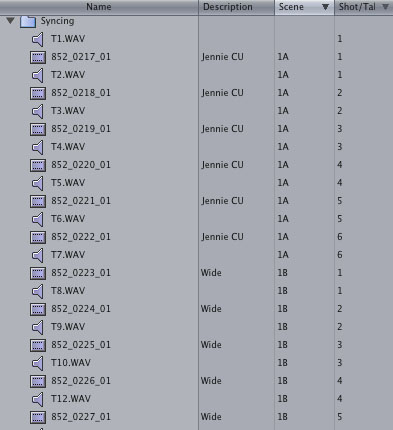
Now you’re ready to sync. Move your audio clips into the same bin as the video clips and sort by Scene by clicking on the Scene header in the bin, with a secondary Shot/Take sort. Hold down shift before clicking on a the header to do a secondary sort. If all your metadata matches, you’ll get nice pairs of clips lined up like this:
Selected one video and one audio clip (hold down shift or ⌘ to select multiple clips) and click Modify/Merge Clips… To save time I assign Merge Clips to the ⌘+Y keyboard shortcut. You can’t assign it to an unmodified keyboard command like just plain Y because that would unselect your clips and select the next clip in a bin that starts with a Y. However you do it, the Merge Clips command will bring up this dialog box:
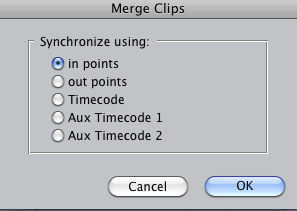
Choose “in points” and hit OK. The Timecode options are for working with jammed timecode or smart slates. I’ve found that smart slates often drift and that syncing up manually like this is more accurate. Your mileage may vary. If you have jammed TC, you don’t need most of this tutorial. In the case of tail slates you’ll use “out points.”
Go through each pair of clips you want to sync and Merge them. You’ll get a third clip with ” Merged” tacked on to the end of the video clip’s name. This is what you’ll edit with.
 Where To Land (2025)August 10, 2025 - 3:59 pm
 The Four Seasons (2025)May 30, 2025 - 10:30 am
 Harlem (2025)May 20, 2025 - 12:46 pm
 Rachel Bloom: Death, Let Me Do My Special (2024)May 20, 2025 - 12:36 pm
 Girls5eva (2022-23)March 23, 2024 - 4:31 pm
Tips for Double System Audio in FCP
/0 Comments/in Editing /by KyleThese days you can record great on-camera audio on many cameras. But there are lots of reasons to still record audio separately even if it’s just a backup. Today I’ll be discussing workflows that only use separate audio recording; the classic double system film workflow.
Start by finding all the visual slates. This is pretty easy. Open the clip, scan through the beginning until you see the clapper hit. If the 2nd AC has read my post on slating, then it will be simple.
Once you’ve marked all the visual slates and filled in the metadata, move on to the audio. FCP makes this really easy by displaying the waveform in the viewer. Slates are pretty obvious.
Mark the first frame of the slate (the sound lasts for a couple frames) with an in point. If it’s a tail slate, mark the first frame with an out point. Fill in the appropriate metadata. Usually you’ll just need Scene and Shot/Take, which the 2nd AC should say clearly right before the marker.
(UPDATE: This part does not appear to work in FCP 7) Now, most tapeless cameras include at least two audio tracks in their files by default. P2 cameras seem to go with 4 as a general habit. This makes things nice and easy when you’re using the on-camera audio. But, for double system audio those tracks can get in the way. If you want to get rid of those extraneous audio tracks, select all of the video clips you plan to sync up and make them offline by choosing “Modify/Make Offline…” from the menu or hitting shift+D on the keyboard. A dialog box will pop up. This is important:
DO NOT DELETE OR MOVE THEM TO THE TRASH!!!! Leave Them on the Disk. All we’re doing here is breaking the link between the clips in the bin and the media file on disk. We’re going to need these files later if we want to edit with them. Hit OK and you’ll have a bin full of offline clips:
Notice in the last row (Tracks) we have “1V, 2A” listed for all the clips. We want to only see “1V” because that’s all we want to work with. Select the clips again and choose “Modify/Clip Settings…” from the menu. Uncheck the “Audio” check box like this:
Hit OK and you’ll see that the “2A” has disappeared from all our clips.
Now, the clips should still be selected, so just choose “File/Reconnect Media…” and Locate the media files on disk. You’ll get a warning about a File Attribute Mismatch
but you already knew that. We changed the number of tracks on purpose, right? So click Continue and then Connect. The files will reconnect and you should see this:
Now you’re ready to sync. Move your audio clips into the same bin as the video clips and sort by Scene by clicking on the Scene header in the bin, with a secondary Shot/Take sort. Hold down shift before clicking on a the header to do a secondary sort. If all your metadata matches, you’ll get nice pairs of clips lined up like this:
Selected one video and one audio clip (hold down shift or ⌘ to select multiple clips) and click Modify/Merge Clips… To save time I assign Merge Clips to the ⌘+Y keyboard shortcut. You can’t assign it to an unmodified keyboard command like just plain Y because that would unselect your clips and select the next clip in a bin that starts with a Y. However you do it, the Merge Clips command will bring up this dialog box:
Choose “in points” and hit OK. The Timecode options are for working with jammed timecode or smart slates. I’ve found that smart slates often drift and that syncing up manually like this is more accurate. Your mileage may vary. If you have jammed TC, you don’t need most of this tutorial. In the case of tail slates you’ll use “out points.”
Go through each pair of clips you want to sync and Merge them. You’ll get a third clip with ” Merged” tacked on to the end of the video clip’s name. This is what you’ll edit with.
Android YouTube App 2.1.6 Shows the Wrong Thumbnails
/1 Comment/in News /by KyleI have a new video on YouTube, and I have an Android phone (a Nexus One. Love it!) and so I wanted to check out how my video looked on my phone. So I pulled up the YouTube app and loaded my channel. I saw this:
Which confused me, because only one of those thumbnails is the right one. In fact, the app shows the third thumbnail generated by YouTube (3.jpg), regardless of the one I’ve chosen to display (default.jpg). Here are the thumbnails available for those videos with the one I’ve selected for display highlighted in yellow. It turns out even the one that looked right was right was the wrong one:
Using this method, you might get the right thumbnail 1/3 of the time, although it turns out I almost never use the 3rd thumbnail. And since I’m a YouTube Partner I often use a custom thumbnail, which makes the odds of getting the right thumbnail through the app even lower.
I checked with my fiancée, who recently bought a Droid Pro, and she saw all the correct thumbnails. It took me a while, but I figured out that she is running the stock Froyo YouTube app, and I had updated mine to 2.1.6 in the Market. I uninstalled updates, and got the right thumbnails.
When I re-installed the update, the bad thumbnails came back. Is anyone else seeing this bug?
Also, while I’m talking about YouTube thumbnails, they seriously need to increase the quality of thumbnails embedded in large windows. Compared to the bandwith and processing requirements of streaming HD video, it should be a piece of cake to generate and serve up higher resolution thumbnails to go along with the greatly increased video quality.
Watch Two Night Stand Two
/0 Comments/in News /by KyleJust finished today! It’s been six years, and Jennie and Steve are waking up in bed together again. Why does this keep happening?
And in case you need a refresher, here’s what happened six years ago. Sorry about the fuzzy video. YouTube is a lot better now.
Wow! I didn’t even plan those shots to match so closely. I totally forgot the original bedroom had one set of folding closet doors open!
So You’re an Angry Professional
/2 Comments/in News /by KyleThis afternoon I watched one too many of those xtranormal videos featuring world-weary professionals dealing with strawmen, so I made my own parody of the genre. Enjoy!
Denis Leary Twitter Book Trailer
/0 Comments/in Editing, News, Web Video /by KyleI cut a trailer for Denis Leary’s Twitter Book “Suck on This Year.” It’s funny and it’s burning up the charts on YouTube. Check it out.
Two Night Stand Two
/0 Comments/in News /by KyleI haven’t really made a live action movie since the summer of 2004, when I directed my not-very-short film Two Night Stand. In the meantime I’ve done some animation, and Truth @ 15 Frames Per Second which wasn’t exactly “shot” so much as it was “recorded.” My main focus during that time has been editing other people’s movies. Which I like very much. I’ve never been a huge fan of Two Night Stand. It was something I felt I needed to do at the time, and I got a lot out of it, but the movie is lacking a certain crazy energy that was in my earlier films. And if you read the comments on YouTube you’ll see quite a few people who agree with me. Many of them feel I’ve robbed 18 minutes of their life. You’ll also see that the video is approaching 1 million views. It’s always been my most popular video, and thanks to some mysterious change in the way YouTube links to and promotes videos, in August views jumped from 500 views/day for the past two years to around 2000/day.
Around that time, a producer I work with watched the movie and asked if there was a sequel. In the process of explaining why I never wanted to make a sequel, I came up with an idea I liked. So I’m getting the band back together. Jennie Tarr & Chris D’Angelo will return, along with the original DP, Alan McIntyre Smith.
The movie will be a lot shorter, and generally a bit nastier than the first one. And it will be in HD! It’s very exciting.
How to Slate a Movie
/1 Comment/in Editing /by KyleI’ve worn a lot of hats in my filmmaking career. I’ve been a script supervisor, data wrangler, post-production supervisor, assistant editor, editor, title designer, and every once in a while I’ve had to slate.
I rather enjoy slating, because later on when I sync up the movie, I know I’ll have quality slates.
I don’t always get quality slates. If you’re slating a movie, here are a few tips to make the editors happier:
Start with the slate in the frame, clapper raised, before the camera rolls.
The first frame of the shot should look a lot like the one above. While the shot is setting up, pay attention to what is actually in frame so you know where to put the slate. On a wide shot like the one above, it’s pretty easy to nail, but in a close-up on a long lens you might need the camera operator to help you find the spot. A slate without the slate in frame is not a slate. And you might need a rack focus. An out of focus slate is not nearly as helpful as one in focus, especially if it’s a smart slate. And you shouldn’t put a slate in an actor’s nose, so it’s a lot easier to find a focus mark for the slate and then rack to the first position for the scene.
Clearly say the shot and take number, then “marker.”
Make sure there is a microphone near you. Just like the camera might need to change focus, the boom operator might need to swing over to you. And don’t say letters. Say words. 24A take 3 is “Twenty-Four Apple Take Three… Marker.” Don’t feel embarrassed if you don’t know the standard codes for letters. You can be creative.
Hold the slate steady as you push the clapper down.
I’ve seen many slates where the slate is moving as it claps, which blurs the whole thing so much that you just have to guess where the mark is. Be careful. Plant your feet. Use two hands. And don’t just let it drop. Push it down. On the other hand, you don’t want to smash it a few inches from an actor’s ears, so you can push it down softly. In that case, say “soft sticks” so the editors know not to listen for a huge click.
If you mess up the first slate, say “Second Sticks.”
There are a lot of things to deal with when syncing a movie, and it can be hard to find the right slate if there’s more than one. If you did the first one out of frame and then re-adjusted to get it right, or if the sound wasn’t recording yet, it’s a quick and easy way to let the editors know.
Sync up a movie yourself.
Nothing teaches you how to slate better than wading through hundreds of bad slates trying to fit all the pieces together.
Back it Up!
/0 Comments/in Editing, Tech /by KyleMy soccer coach always said Expect The Unexpected. I swear to God he also once said there is no “me” in team.
In general, hard drives don’t fail during the first few years of their lives. As long as they stay under normal operating conditions they’re pretty reliable. But they’re also delicate and fragile machines spinning around at intense speeds. Stuff goes wrong. So if your masters are data based and not tape or film, you better be prepared.
Last night I came home with the first dailies from a new movie on a portable hard drive from Glyph. I’ve had great experiences with their drives. I like the little leather cases on the Portagigs and I love the standard power cables on the fullsize ones. But last night when I tried to copy the dailies to my editing drive, on ten of the files, I consistently got a -36 error, unable to read or write to the disk. I got a little worried, but I wasn’t extremely concerned because I had a backup.
Whenever I work on a movie shot on cards (which is pretty much all of them now) I always insist on transferring to at least two drives. Sometimes I do three. Drives are cheap. Re-shooting a whole day is not. This morning I went back to set and copied the files from the backup drive to the one I had brought home. It worked fine. Notice I didn’t have the backup with me. Another important step is to physically separate your backups. If you drop your bag in front of a subway train, all that backing up won’t matter.
A New Twist on the Nigerian Scam Letter
/0 Comments/in Commentary /by KyleI haven’t seen a good Nigerian 419 scam letter in a while, I think because Gmail filters them out. But this one was smart enough to target me as a filmmaker and it got through the filters. It’s a pitch for a film called “Bear Beer Dear.”
I like the ingenuity here, and the willingness to do the work to track down people actually involved in film, but nobody would want to even watch that movie, let alone invest in it. It’s hard enough to raise money for movies that aren’t completely incoherent. My advice: pitch classic films that might not be caught by the weak-minded people you’re trying to scam.
Special thanks to Google Translate for providing that authentic machine translation feel.