For the past 10 years I’ve edited almost exclusively in Avid, and I like editing with it very much. Last year I edited two projects in Premiere. I often hear that Premiere can’t trim as well as Avid, but in my experience it works pretty much the same, except that in Premiere you can trim in the timeline without opening up the trim mode window. That can be confusing because Avid editors are used to the trim window automatically opening whenever you select an edit. The default keyboard command to open trim mode is Cmd+T (Shift+T in Windows) or you can open it by double-clicking on an edit point.
707 views
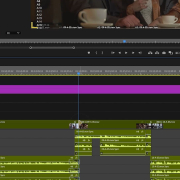
Premiere Asymmetrical Trim
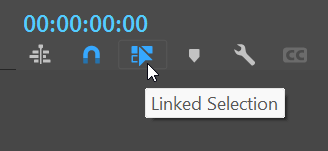
To do an asymmetrical trim (the holy grail of trimming) where one or more tracks are moving in different directions make sure linked selection is turned off. You can either disable it by clicking the icon in the upper-left of the timeline
or hold down Option (Alt in Windows) when selecting edits to temporarily toggle it. Select multiple edits by holding shift when clicking. Once you’ve selected your edit points you can trim using the keyboard commands Cmd+Left arrow/Right arrow (Ctrl in Windows). Add shift to trim “many” frames. You can change how many frames that is in Preferences/Trim/Large Trim Offset.
While I was editing The Fall & Rise of Reggie Dinkins pilot (coming to NBC this year!) I spent a lot of time thinking and talking about fake documentaries and how they work. I was obsessed with them in college. I called them “fictumentaries” instead of mockumentaries because I thought “mocking” was a reductive way of thinking about the genre. Now I think “mock” is clearly referring to the other meaning of mock: not real or authentic. I even convinced Harvard to pay me a few grand to research the genre over the summer in preparation for my thesis film. Around the same time as Reggie Dinkins I listened to an episode of Hyperfixed about lost films, and it inspired me to do something about the 16mm fake documentary student films slowly turning to vinegar in my basement.
I checked in my crumbling box of film material that survived two apartment moves unopened. I had the original camera negatives for my thesis film, but I realized I left the negatives for my junior year film at Cinelab in Fall River, MA over 20 years ago. I emailed Cinelab and they still had everything in their vault! The boxes were sitting on top of an unlabeled can, and it took a while for Cinelab to verify that the can was unrelated to my film. (#1 lesson of film school: always label your film cans & tapes) So if anyone’s looking for “a single large roll of color reversal family films with boats in what looks like New England,” Cinelab has it.
Once I collected all my film materials, I brought them to PostWorks New York, where I’ve had the majority of my professional editing gigs. PostWorks scanned them in at 2K and I got to work. First, I was delighted to see that they scan all the way to the sprocket holes.
and in most cases the shot was matted in the camera so there wasn’t any picture there, but there were a handful of shots that were exposed all the way to the edge of the frame. I’m not sure why that happened. I can only assume it was operator error.
Since there’s no vertical space between frames like there usually is on 35mm film, 16mm film negatives are (or were) cut in an A/B roll checkerboard pattern. In the first frame above, you can see a little bit of black from the splice at the very top of the frame. There’s even more of the splice that would be visible on the bottom of the previous frame, but instead the negative cutters put in black leader on every cut and alternate shots on each roll so the majority of the splice is hidden in the black leader. When a print was made they would sync up the two rolls and only print the parts that had picture on them. In modern 2025 times, you run both negative rolls through the film scanner and manually edit them together. It looks like this:
That was the easy part. Then I had to color correct these ancient student films. Camera Noise was shot in 2001 on the worst, noisiest film stock around: 800T Kodak 7289. It was discontinued a few years after I shot it because it sucked. I don’t know if there was also damage from fading over the years, but the opening shots of Camera Noise had almost no blue information in them:
UncorrectedCorrected
I’ve done enough color work in Resolve over the years to fake it, but this was tough. I had intentionally chosen to underexpose this terrible film stock to imitate other poorly-made student films I had suffered through, and now 25 years later I wanted to make it look a little better. Using the Lift/Gamma/Gain controls to adjust the color ended up making it feel thin, sort of stretched, like butter scraped over too much bread. Then I found Darren Mostyn’s excellent tutorial on the RGB Mixer. Using his technique I was able to dial in the color and restore information into the blue channel before I added gain and gamma, and lowered the lift. I used the Lum vs Sat curve to desaturate the shadows a bit. And I added some noise reduction, high on the Chroma threshold, very low on Luma to preserve detail.
UncorrectedCorrected
It’s not perfect, but it’s a lot better than the old standard definition telecine I made from a 16mm release print, which was the only way to watch it for the past 20 years:
Here’s a little trailer I made to demonstrate the enhancement:
After Camera Noise, fixing up the sequel The Epic Tale of Kalesius and Clotho was easy. I shot it with the intention of doing the best job I could. I used much better stock, lit the scenes, and actually had someone else shoot it for me, so at the very least I didn’t have to turn on the camera and then run into position. The main challenge was the scene when my character goes to Jennie’s apartment to make a grand romantic gesture. It was extremely grainy. I think it might have been pushed a stop or two. Oddly enough, you can’t even see the sprocket holes in the full frame scan.
Once again, Resolve’s noise reduction tools came in handy with a big chroma threshold and low luma. I also had some trouble with the scene from Camera Noise that I showed in Kalesius and Clotho. In the old days I had to make a duplicate of the negative in order to use the clip in two different places. That led to some generation loss, which I tried reducing with sharpening and noise reduction until I finally realized I could use modern editing techniques to just cut in the original clip from Camera Noise.
Duplicated NegativeOriginal Negative
There’s also a bunch of DV footage in Kalesius and Clotho that was transferred to 16mm using something like a kinescope. I don’t remember the exact technique, but I do remember that it was the cheapest possible method available and only DuArt was offering it at the time. I am pretty sure I still have the original DV tape, but I don’t have an easy way to capture DV tapes anymore, and I always preferred the weird look of the 16mm transfer so I kept it for this remaster.
I didn’t do anything to the audio because it was already digitally mastered even way back then. John Koczera, the staff tech guy in the film department rigged up a way to use a Steenbeck to trigger Pro Tools playback. It wasn’t perfect sync, so it would drift if you played it long enough, but it was good enough to do the sound editing and then bounce a final mix to disk. I don’t even know where the optical sound track is for Camera Noise, but there’s nothing worth saving in a 16mm optical sound track.
After all the remastering was finished, I had to do the thing I dreaded most in the whole process: actually watch these very personal, very embarrassing movies. I managed to get through them, but I had to watch a few scenes through my fingers because it was so awkward. I can say with the benefit of 20 years of professional editing experience that they are way too long, but also there a few good jokes that are built on solid editing.
I have one day off with my son at school and how did I spend my morning? Editing! Here’s one second from the past decade of every season of TV, pilot, movie, commercial, or whatever that I can remember editing and have a copy of.
36 views
Kyle Gilman 2020 A Decade of Editing
I think Marc Maron is in this the most, and I’ve definitely edited more of Marc than anyone else, but Robert Kellyis a close second. Really grateful to Jim Serpico for hiring me on so many of these projects.
You can catch cameos of me waving to the guy in the row boat, and the audio tape where I say “detriment to holding office,” which I believe is the only temp audio I’ve done that actually made it to air. Thanks to Bobcat Goldthwaitfor that sweet residual check.
I don’t know if this is still a problem that needs solving, but I always had trouble finding free countdown leader. Years ago I made this 1080p 23.98 ProRes Proxy QuickTime countdown by modifying the project that came with FCP 7. Feel free to download and use in your own projects. Click on the overlay pop-out icon to get the download link.
So at the moment, FCP X is pretty much a disaster. Lots of people are saying that it will get better, but for now I could never make a movie with it. That’s not being elitist or anything, it’s just a tool that I can’t use. Maybe it will get to a point where we can use FCP X, but for now I’m working under the assumption that FCP 7 is the end of the line for me.
Now, I just upgraded to FCP 7 a couple weeks before the release of FCP X, and I’m feeling pretty clever about that. But it also points out an important thing. We don’t always have to use top-of-the-line software to edit. I tend not to work under crazy deadlines, so things like 32-bit rendering and lack of multicore support are more minor annoyance than workflow killer. If I can bring videos files in, convert them to a nice codec, edit them, and then export in several different ways, including OMF, then I’m very happy.
So I’m not here to complain about FCP X. Maybe it will end up being awesome. At the moment I worry about little things like having to trick it into doing audio and video transitions separately but maybe the world is changing and I won’t be the cool kid who know how all the software works anymore. I’ll be using FCP 7 until it stops being useful to me then I’ll try something else. I want to explore the other options I’ve ignored for so long because FCP was so good.
First up is Avid. Avid has really stepped up its game in the past few years. They’ve put out a ton of releases, and most importantly for me, they’ve started limited support for 3rd party I/O hardware. Cost has always been my biggest problem with Avid. I know it works great, but I just don’t have the money for a $5,000 Mojo DX. I’m using a $200 Blackmagic Intensity Pro right now, and it does absolutely everything I need. Avid doesn’t support any Blackmagic cards, but the $450 Matrox MXO2 Mini they currently support is a fair deal. The great thing about Avid is DNxHD, which is just as wonderfully simple as ProRes, and it’s freely available, which will become important as we look at other options.
I experimented with Adobe Premiere back in college, and I couldn’t make heads or tails of it. It wasn’t quite as confusing as iMovie, but it immediately turned me off. In the meantime, Adobe has totally overhauled the program, and it is by many accounts a great program. I’ve always considered it a bit of a joke, but considering that it already comes with the Production Premium suite, a lot of places I work already own it. And it works with all the same hardware FCP does. I’m anxious to try a small project with it to see how things turn out. It seems like a poor-man’s FCP 7, but a very rich man’s FCP X. It’s written in modern code, and fully takes advantage of the power of our modern computers, but it also looks and feels like a regular editing program. What it doesn’t have is a ProRes or DNxHD. If you already have FCP on your computer, you can use ProRes, but that’s not something we can rely on indefinitely. It seems like DNxHD would be the best choice, since you’ve long been able to install Avid codecs on any computer separately from the Avid software.
The wild card I started thinking about this week is Lightworks. It has a long history, with long-time Scorsese editor Thelma Schoonmaker being the most prominent of the fancy-pants editors who use it. I talked with her assistant about it a couple years ago and he was actually using FCP to do a lot of supplemental work, because Lightworks was missing some of the fancy new HD features FCP could handle at the time. It was recently turned in to open source software, although the full source code hasn’t been released yet. The price of $0 is hard to beat. They plan to update it with a lot of the things that I would like to see in an editing software, including support for the fancy codecs I like so much. I’m going to download it and try it out soon, and I will report back on my impressions. At the moment it only runs on Windows, which is a big scary thing for some people, but I for one would welcome a return to Windows. The only reason I switched to Mac OS was for FCP, but with that out of the picture, all the major programs are available for either platform.
I think we’ve all learned a valuable lesson recently, that counting on a single company to supply all of our needs is foolish. I’ve even seen some rumblings online that Apple might abandon the Mac Pro. Without the expansion slots and huge processing power of the Mac Pro, you’re left with the future promise of Thunderbolt, which sounds pretty cool, but leaves out decades of legacy connectors only available through PCI Express slots, like Fiber, SCSI, SAS, etc. and we can’t all just go out and buy new storage solutions every couple years. What we can definitely be flexible about is software. Software is cheap, and the more of it we know, the better off we’ll be.
These days you can record great on-camera audio on many cameras. But there are lots of reasons to still record audio separately even if it’s just a backup. Today I’ll be discussing workflows that only use separate audio recording; the classic double system film workflow.
Start by finding all the visual slates. This is pretty easy. Open the clip, scan through the beginning until you see the clapper hit. If the 2nd AC has read my post on slating, then it will be simple.
Not Yet!
There’s the slate. Mark an in point (“i” on the keyboard) for most slates, or an out point (“o” on the keyboard) if it’s a tail slate. While you’re at it, fill in some metadata. When you’re at this frame you can easily see the Scene and Take number, so fill those in in the appropriate columns of the bin. A brief description will be very helpful too.
Once you’ve marked all the visual slates and filled in the metadata, move on to the audio. FCP makes this really easy by displaying the waveform in the viewer. Slates are pretty obvious.
Mark the first frame of the slate (the sound lasts for a couple frames) with an in point. If it’s a tail slate, mark the first frame with an out point. Fill in the appropriate metadata. Usually you’ll just need Scene and Shot/Take, which the 2nd AC should say clearly right before the marker.
(UPDATE: This part does not appear to work in FCP 7) Now, most tapeless cameras include at least two audio tracks in their files by default. P2 cameras seem to go with 4 as a general habit. This makes things nice and easy when you’re using the on-camera audio. But, for double system audio those tracks can get in the way. If you want to get rid of those extraneous audio tracks, select all of the video clips you plan to sync up and make them offline by choosing “Modify/Make Offline…” from the menu or hitting shift+D on the keyboard. A dialog box will pop up. This is important:
DO NOT DELETE OR MOVE THEM TO THE TRASH!!!! Leave Them on the Disk. All we’re doing here is breaking the link between the clips in the bin and the media file on disk. We’re going to need these files later if we want to edit with them. Hit OK and you’ll have a bin full of offline clips:
Notice in the last row (Tracks) we have “1V, 2A” listed for all the clips. We want to only see “1V” because that’s all we want to work with. Select the clips again and choose “Modify/Clip Settings…” from the menu. Uncheck the “Audio” check box like this:
Hit OK and you’ll see that the “2A” has disappeared from all our clips.
Now, the clips should still be selected, so just choose “File/Reconnect Media…” and Locate the media files on disk. You’ll get a warning about a File Attribute Mismatch
but you already knew that. We changed the number of tracks on purpose, right? So click Continue and then Connect. The files will reconnect and you should see this:
Now you’re ready to sync. Move your audio clips into the same bin as the video clips and sort by Scene by clicking on the Scene header in the bin, with a secondary Shot/Take sort. Hold down shift before clicking on a the header to do a secondary sort. If all your metadata matches, you’ll get nice pairs of clips lined up like this:
Selected one video and one audio clip (hold down shift or ⌘ to select multiple clips) and click Modify/Merge Clips… To save time I assign Merge Clips to the ⌘+Y keyboard shortcut. You can’t assign it to an unmodified keyboard command like just plain Y because that would unselect your clips and select the next clip in a bin that starts with a Y. However you do it, the Merge Clips command will bring up this dialog box:
Choose “in points” and hit OK. The Timecode options are for working with jammed timecode or smart slates. I’ve found that smart slates often drift and that syncing up manually like this is more accurate. Your mileage may vary. If you have jammed TC, you don’t need most of this tutorial. In the case of tail slates you’ll use “out points.”
Go through each pair of clips you want to sync and Merge them. You’ll get a third clip with ” Merged” tacked on to the end of the video clip’s name. This is what you’ll edit with.
I’ve worn a lot of hats in my filmmaking career. I’ve been a script supervisor, data wrangler, post-production supervisor, assistant editor, editor, title designer, and every once in a while I’ve had to slate.
I rather enjoy slating, because later on when I sync up the movie, I know I’ll have quality slates.
I don’t always get quality slates. If you’re slating a movie, here are a few tips to make the editors happier:
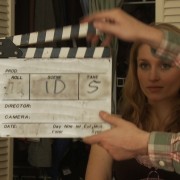
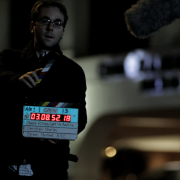
Start with the slate in the frame, clapper raised, before the camera rolls.
The first frame of the shot should look a lot like the one above. While the shot is setting up, pay attention to what is actually in frame so you know where to put the slate. On a wide shot like the one above, it’s pretty easy to nail, but in a close-up on a long lens you might need the camera operator to help you find the spot. A slate without the slate in frame is not a slate. And you might need a rack focus. An out of focus slate is not nearly as helpful as one in focus, especially if it’s a smart slate. And you shouldn’t put a slate in an actor’s nose, so it’s a lot easier to find a focus mark for the slate and then rack to the first position for the scene.
Clearly say the shot and take number, then “marker.”
Make sure there is a microphone near you. Just like the camera might need to change focus, the boom operator might need to swing over to you. And don’t say letters. Say words. 24A take 3 is “Twenty-Four Apple Take Three… Marker.” Don’t feel embarrassed if you don’t know the standard codes for letters. You can be creative.
Hold the slate steady as you push the clapper down.
I’ve seen many slates where the slate is moving as it claps, which blurs the whole thing so much that you just have to guess where the mark is. Be careful. Plant your feet. Use two hands. And don’t just let it drop. Push it down. On the other hand, you don’t want to smash it a few inches from an actor’s ears, so you can push it down softly. In that case, say “soft sticks” so the editors know not to listen for a huge click.
If you mess up the first slate, say “Second Sticks.”
There are a lot of things to deal with when syncing a movie, and it can be hard to find the right slate if there’s more than one. If you did the first one out of frame and then re-adjusted to get it right, or if the sound wasn’t recording yet, it’s a quick and easy way to let the editors know.
Sync up a movie yourself.
Nothing teaches you how to slate better than wading through hundreds of bad slates trying to fit all the pieces together.
My soccer coach always said Expect The Unexpected. I swear to God he also once said there is no “me” in team.
In general, hard drives don’t fail during the first few years of their lives. As long as they stay under normal operating conditions they’re pretty reliable. But they’re also delicate and fragile machines spinning around at intense speeds. Stuff goes wrong. So if your masters are data based and not tape or film, you better be prepared.
Last night I came home with the first dailies from a new movie on a portable hard drive from Glyph. I’ve had great experiences with their drives. I like the little leather cases on the Portagigs and I love the standard power cables on the fullsize ones. But last night when I tried to copy the dailies to my editing drive, on ten of the files, I consistently got a -36 error, unable to read or write to the disk. I got a little worried, but I wasn’t extremely concerned because I had a backup.
Whenever I work on a movie shot on cards (which is pretty much all of them now) I always insist on transferring to at least two drives. Sometimes I do three. Drives are cheap. Re-shooting a whole day is not. This morning I went back to set and copied the files from the backup drive to the one I had brought home. It worked fine. Notice I didn’t have the backup with me. Another important step is to physically separate your backups. If you drop your bag in front of a subway train, all that backing up won’t matter.