
Tips for Double System Audio in FCP
These days you can record great on-camera audio on many cameras. But there are lots of reasons to still record audio separately even if it’s just a backup. Today I’ll be discussing workflows that only use separate audio recording; the classic double system film workflow.
Start by finding all the visual slates. This is pretty easy. Open the clip, scan through the beginning until you see the clapper hit. If the 2nd AC has read my post on slating, then it will be simple.
 Not Yet!
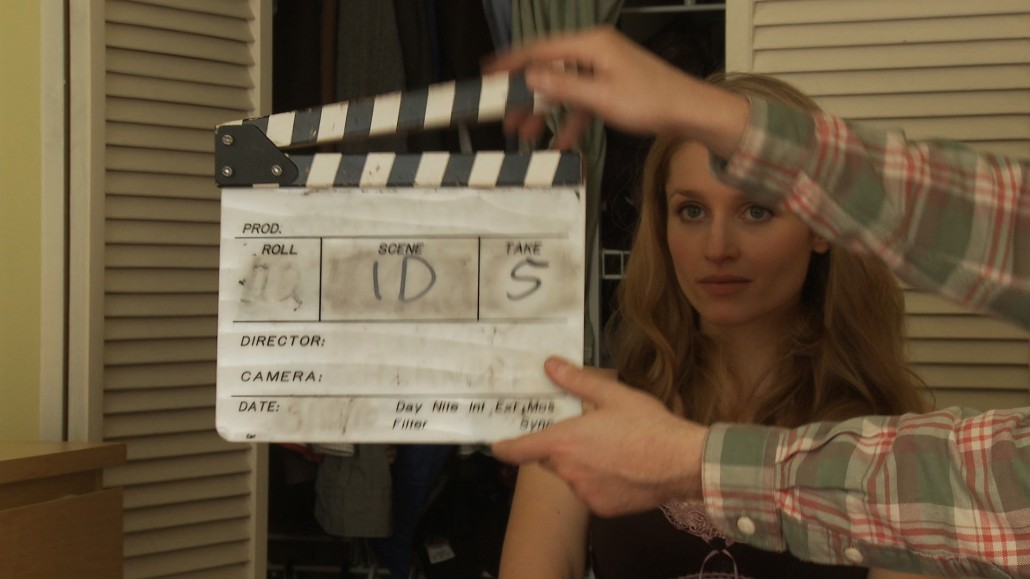
 There’s the slate. Mark an in point (“i” on the keyboard) for most slates, or an out point (“o” on the keyboard) if it’s a tail slate. While you’re at it, fill in some metadata. When you’re at this frame you can easily see the Scene and Take number, so fill those in in the appropriate columns of the bin. A brief description will be very helpful too.

Once you’ve marked all the visual slates and filled in the metadata, move on to the audio. FCP makes this really easy by displaying the waveform in the viewer. Slates are pretty obvious.

Mark the first frame of the slate (the sound lasts for a couple frames) with an in point. If it’s a tail slate, mark the first frame with an out point. Fill in the appropriate metadata. Usually you’ll just need Scene and Shot/Take, which the 2nd AC should say clearly right before the marker.
(UPDATE: This part does not appear to work in FCP 7) Now, most tapeless cameras include at least two audio tracks in their files by default. P2 cameras seem to go with 4 as a general habit. This makes things nice and easy when you’re using the on-camera audio. But, for double system audio those tracks can get in the way. If you want to get rid of those extraneous audio tracks, select all of the video clips you plan to sync up and make them offline by choosing “Modify/Make Offline…” from the menu or hitting shift+D on the keyboard. A dialog box will pop up. This is important:

DO NOT DELETE OR MOVE THEM TO THE TRASH!!!! Leave Them on the Disk. All we’re doing here is breaking the link between the clips in the bin and the media file on disk. We’re going to need these files later if we want to edit with them. Hit OK and you’ll have a bin full of offline clips:

Notice in the last row (Tracks) we have “1V, 2A” listed for all the clips. We want to only see “1V” because that’s all we want to work with. Select the clips again and choose “Modify/Clip Settings…” from the menu. Uncheck the “Audio” check box like this:

Hit OK and you’ll see that the “2A” has disappeared from all our clips.
Now, the clips should still be selected, so just choose “File/Reconnect Media…” and Locate the media files on disk. You’ll get a warning about a File Attribute Mismatch

but you already knew that. We changed the number of tracks on purpose, right? So click Continue and then Connect. The files will reconnect and you should see this:

Now you’re ready to sync. Move your audio clips into the same bin as the video clips and sort by Scene by clicking on the Scene header in the bin, with a secondary Shot/Take sort. Hold down shift before clicking on a the header to do a secondary sort. If all your metadata matches, you’ll get nice pairs of clips lined up like this:

Selected one video and one audio clip (hold down shift or ⌘ to select multiple clips) and click Modify/Merge Clips… To save time I assign Merge Clips to the ⌘+Y keyboard shortcut. You can’t assign it to an unmodified keyboard command like just plain Y because that would unselect your clips and select the next clip in a bin that starts with a Y. However you do it, the Merge Clips command will bring up this dialog box:

Choose “in points” and hit OK. The Timecode options are for working with jammed timecode or smart slates. I’ve found that smart slates often drift and that syncing up manually like this is more accurate. Your mileage may vary. If you have jammed TC, you don’t need most of this tutorial. In the case of tail slates you’ll use “out points.”
Go through each pair of clips you want to sync and Merge them. You’ll get a third clip with ” Merged” tacked on to the end of the video clip’s name. This is what you’ll edit with.


Leave a Reply
Want to join the discussion?Feel free to contribute!