Vuze Improves

I had some troubles with Vuze (the peer-to-peer-video part, not the excellent part formerly known as Azureus) in the past, but last week I used it to submit my entry for the OpenCut competition and I saw some real improvement. For some reason my video was not compatible with Vuze’s re-encoding software, so you can’t just hit play and have it start as it downloads. I think that’s because it’s 1080p, and as far as I can tell most of their HD stuff is 720p. But I’m not really sure. Either way, Vuze seems perfectly happy to keep my 280 MB QT file on their servers and send it to anyone who wants it. I uploaded Two Night Stand, and it was re-encoded by Vuze, and it seems like great quality.


To download the full version visit vuze.com

Vimeo still has them beat as far as I’m concerned. You don’t need special software to download or watch anything from Vimeo. Of course it remains to be seen if Vimeo can keep paying for all that bandwidth. Vuze gets to exploit its users’ bandwidth, which obviously saves a lot of money. But if the cable and telephone companies change their business models and start charging residential customers for their bandwidth usage you can be sure Vuze won’t be quite so attractive.

Red TC Fixer

Scott Simmons at The Editblog has noticed a serious problem in the Red post workflow. There are two timecode tracks in R3D and their associated QT proxy files. One is known as “edge code” and is generated as rec run. It is continuous from the end of one shot to the beginning of the next. The other track is time of day. If your camera is set up to display edge code during shooting, QT will display edge code. If it’s displaying TOD, QT will display TOD.

I did some peeking under the hood, and it seems that the QT proxy files generated by the camera have two timecode tracks. The first track is whatever was displayed during shooting. If you delete Timecode Track 1, QT will now display the other type of timecode. If edge code was turned on in your clip and you delete Track 1, you’ll see TOD.

Unfortunately, right now it looks like there are a number of applications that are only looking at the TOD, so if you’re going to do an assembly it seems to make sense to work in TOD. If your production wasn’t aware of this problem and had edge code display turned on in camera, and you still want to work with proxies, I’ve made an AppleScript to delete the first TC track for all the QuickTime files in any directory and its subdirectories. Use with extreme caution. The script will permanently delete the first TC track from any QT file in its path. If you want the track back you have to regenerate the proxy files. I’ve done limited testing with this, and I’ve never worked with AppleScript before, so please be careful.

Download “RemoveTCTrack” 0.1

OpenCut Begins

Right now I’m participating in the first “OpenCut” project, which is a great idea unfortunately saddled with an awful script. Basically some very clever people came up with a great way to give people access to footage shot with the exciting new Red One camera. I’ve been following the development of the camera and went to NAB NY last year to see some 4K Red footage projected. It was very pretty. But I haven’t worked with any producers or directors crazy enough to try it out on a film yet. There are definitely still a lot of limitations and a lot of bugs to be worked out, but the promise of the system is incredible.

So the OpenCut people shot a short film on the Red One and they’re giving the footage to anyone who pays the very reasonable $25 fee. I just got my hard drive in the mail today and I’m currently transcoding everything into ProRes HQ and syncing up the audio.

Here’s why ProRes HQ. You see, Red shoots in a kind of RAW format, like digital still cameras can do. It retains metadata regarding exposure and whatnot, but you can adjust that after it’s shot. It’s all very fancy, but I don’t want to spend my time grading the image before I edit. You end up wasting a lot of time on footage that you won’t use. That’s why you do a quick one-light telecine when you’re working on film. I just want to start working on the footage as soon as possible. You can’t edit straight from the “RAW” (actually .r3d) files, but the camera automatically generates QT reference (proxy) files of various resolutions. You can edit using those proxies, but it requires access to the original r3d files and a lot of processing power. My quad-core 3 gHz processor is around 90% on all cores while playing back one of those files. I can add some real-time effects in there too, but it makes me uneasy. So I’m going with something I know. I know ProRes HQ is great, and my processor barely breaks a sweat once it’s transcoded.

I’m doing the transcoding using the Red Log and Transfer Plugin, which works just like those old-fashioned P2 cards. You open up the original folders and start transcoding the clips you want. FCP creates a master clip and generates the new media on your scratch disk. I noodled around with RedAlert, which seemed nice, but had more controls than I wanted, and I tried RedCine, which was completely baffling, and usually froze up on me. I never even managed to figure out how to export a clip (UPDATE: Hit the big red “Go” button). The Log and Transfer Plugin is definitely the simple way to go.

I’ve looked at some of the footage, and I started syncing the audio. For some reason it was recorded at 44.1 kHz, so I have to be careful to change my sequence settings to match. There are no scene numbers either, which I guess makes sense for such a short film and for a project that will be edited by different people in presumably wildly different ways, but it threw me a bit. Every shot is assigned a number, although luckily it’s not in shooting order like they do in the foreign lands (a confusing system obviously not designed by an editor). It’s in order based on the script / storyboards as far as I can tell.

As for the script, the less said about it the better. I’m going to do my best to turn the movie into something completely different.

Editing La Commedia – Part 2

I’m back from Amsterdam and we’ve finished editing La Commedia. A few weeks ago I described the basic setup we were working with. The whole thing worked beautifully. We almost never rendered anything. There were times when playing back a freeze frame while 2 other video streams were running would cause dropped frames, but that just required a quick render on the 8-core Mac Pro we were working on. The finale of the show finally uses all 5 screens at once in a seizure-inducing extravaganza that also included some effects, so that needed rendering as well. But for the majority of the show I was able to edit up to 4 streams of resized HD video in realtime.

This is an example of the format we used during editing. Each picture represents one of the 5 screens that will be in various locations throughout the theater. The “C” screen is not in use in this example.

The real difficulty in this project was creative. The opera doesn’t really have a clear narrative like a traditional opera. It’s more fragments of ideas that all relate to a theme. Hal Hartley, the director of the show, came up with a separate story for the film that was inspired by the ideas in the opera. But while there’s a clear relationship between the two, the film is definitely not just an illustration of what the people are singing about on stage. And I usually had no idea what anyone was singing about anyway since we edited to MIDI recordings of the score.

As we started editing there were a lot more decisions to be made than usual. In a movie you can take for granted the fact that you’re going to have an image on screen most of the time. You might have a few seconds of black here and there, but in general movies tend to have something going on all the time. But with a stage production, you might not have any video at all for several minutes while the audience focuses on some activity on the stage. And if we do want to show some video, we have 5 different screens to choose from. And some portions of the audience can’t see some of the screens. Some of the audience sees the back side of some of the screens, so the image is in reverse and we can’t put text on those screens. It was all very tricky. Read more

YouTube Gets Better

The mystery is over. YouTube, in another in a long series of overdue moves, has revealed some real information about how people find your YouTube videos. In my case, it turns out that my most popular videos happen to be declared “related” to some other, more popular videos. I’ve never questioned the success of the “Bad Webcam Sex” video, which is naturally connected to all kinds of filth that people are mistakenly looking for on YouTube instead of the entire rest of the Internet. What really surprised me was the sudden and unexpected rise of viewers for Two Night Stand. I’ve now learned that nearly 50% of the traffic comes from being “related” to a video called “Fake Wife Swap” which was made for one of those 24-hour film festival challenges. 90% of Two Night Stand viewers come from related videos.

The other big change—which still hasn’t quite worked itself out yet—is the so-called “high quality” option for YouTube videos. On certain videos (the criteria isn’t at all clear to me) you can add &fmt=6 to the URL and get a significantly better video. Unfortunately I don’t know what you have to upload in order to get the higher quality. Is it a higher resolution, or a higher bitrate that I should be going for? Adding &fmt=6 to most videos gets you the usual blender-set-on-purée look. Some guidance from YouTube would be nice.

UPDATE: Brian Gary has an article at kenstone.net explaining the best settings to use to take advantage of YouTube’s higher quality options.

A Stopgap Solution

I was working on a movie in Avid Xpress Pro (on Windows XP) recently and I figured it was time to finally get some equipment so I (and a client) could watch the video on an external monitor. A DV deck is the usual way. You hook up the deck to the computer via firewire, the deck translates the DV to analog, you hook your TV into the deck and you’ve got NTSC video. Trouble is, I have very little use for a deck. Most projects I edit these days come to me already on a hard drive. DV tape is obviously on its way out, and spending $2000 on a deck I won’t be using much longer seems a little silly.

I was hoping to get an Intensity Pro. I didn’t need to capture or output any tapes, so that seemed ideal since it could also handle HD. But then I remembered that Avid doesn’t play well with others. Avid only works with Avid DNA products like the Mojo. The Mojo is essentially a glorified digital/analog converter that also adds 2:3 pulldown to 24p video in realtime and retails for $1700. It’s worth noting that Final Cut Pro adds 2:3 pulldown for free.

sony-dcr-hc28192046.jpg
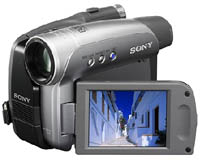
I considered a D/A converter, but they all run around $200 and don’t have any tape decks, in case I do need to capture a tape here and there. Eventually I decided that a cheap camcorder was my best option. First I got a $160 Canon camcorder. With Avid Xpress Pro I was getting a 16 frame delay and often drifting out of sync, which I assumed was because it was a cheap piece of crap. I returned it and got a $190 Sony DCR-HC28 since I’ve had such good experiences with Sony decks. I still get the 16 frame delay with the Sony camcorder, but I don’t have the drifting problem. I was working on a different project in Final Cut Pro, so I booted up the Mac OS to see what the delay would be. Turns out it’s only 2 frames, which is what I usually expect from FCP with a firewire deck. That really surprised me since it’s the same computer. From what I’ve read in online forums, the 16 frame delay is standard for Avid without a DNA like the Mojo. I’ve turned on desktop play delay, which keeps the video in sync, but it makes editing a bit more difficult.

I don’t have any plans to start shooting home movies, so I can’t say anything about the image quality of the camera. I can only assume it’s horrible.

Thank God That’s Over

Well, it’s official, HD DVD is dead. Now you can finally get a high definition DVD player without worrying it’s going to turn into a Betamax. I’ve looked at the options available and it seems pretty obvious that much like my first DVD player, the best value comes from the Playstation. Way back in 2001 I bought a Playstation 2 because I wanted to watch DVDs on TV instead of on my computer. And also because I like to play the occasional video game. It turns out the Playstation 2 was a pretty bad DVD player, but it served its purpose for a couple years until I got a very nice standalone DVD player. The PS2 spent a few years in the closet until it was resurrected for Guitar Hero.

Now, all the Blu-Ray players available retail for $300-400. A Playstation 3 can be had for as little as $400. So for a few extra bucks you get a really fancy computer along with the ability to play high definition DVDs. I think it’s going to be a while before I pony up that cash. I’m still really happy with the quality of anamorphic DVDs on my plasma. It might have to wait until after I get a 1080p display. I’d love to get Rock Band though.

Other pieces of equipment in line ahead of the PS3:

  • A new graphics card. Leaning towards an nVidia 8600. My 6600 is getting pretty long in the tooth.
  • A spiffy HTPC case for the guts of my old computer. I’m planning to hook up my computer to the plasma TV in the living room so we can check IMDb without leaving the couch. We’ll even be able to do picture-in-picture. Also, we can watch videos downloaded from the Internet.
  • A Blackmagic Intensity Pro. For only $350 you get HD out of your computer, and realtime downconversion to SD.
  • A new HD TV. Probably a 42″ plasma for the living room, so I can use the year-old 37″ as a client monitor in my office. I’m hoping Panasonic puts out some smaller 1080p displays soon.

That Was Hard

inside_computer.jpg
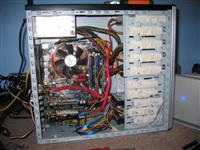
I upgraded my computer a couple weeks ago, swapping out the motherboard, CPU, and RAM, but leaving the hard drives and case alone. I thought it would be pretty simple. I knew Windows would work without a hitch, but I knew from the beginning that I’d have to reinstall the Mac OS because it had been patched to work on my old AMD processor. What I didn’t know was that the OSX-on-a-PC drive interface situation had flipped since the last time I installed OSX. With my nForce4 motherboard, it was a hassle to install onto SATA drives. With my ASUS P5K-E P35/ICH9R motherboard, OSX refused to even see my PATA/IDE drives. My DVD burner and my Mac hard drive were both IDE, so I was in trouble. I went through a lot of work, so I thought I’d document it all for anyone who’s dealing with the same problems. The geniuses over at the Insanelymac forums were a huge help. Here’s what I did:

  1. Bought a new SATA hard drive. I can never get enough storage anyway.
  2. Used VMware Workstation to format the disk to HFS+ and install the OS. I followed the instructions on this post, although I used the Kalyway 10.4.10 install disc because I need 10.4.10 in order to run FCP 6
  3. Replaced AppleAHCIPort.kext with the one at this post
  4. In the BIOS, switched SATA mode to AHCI (from IDE)
  5. BOOTED UP OS X!!!!!!
  6. Ran script to get onboard components (sound, ethernet, etc) working.
  7. Switched SATA back to IDE mode in the BIOS and booted into Windows.
  8. Followed these instructions to enable AHCI mode in Windows XP
  9. Switched SATA to AHCI mode in the BIOS and booted into Windows.
  10. Suddenly I had a nasty audio skipping problem. It was clearly related to AHCI mode. It turns out it was caused by an eSATA drive I had plugged in to the computer, but not powered on. My guess is because of the hot-swapping capabilities of AHCI, the system kept polling the drive trying to figure out what it was, while in IDE mode it doesn’t bother looking.

I’m sure I missed a few steps, but those are the ones that stick out in my memory. There might have been some extra fiddling with ATA-related kexts. I also continue to have a problem mounting the boot disk when I boot with cached kexts. I use the -f flag on the Darwin bootloader to get around that problem.