Converting edited 29.97 Video to 23.98 in FCP

For the past couple weeks I’ve been working for Revel in New York, a very cool new online video series. I started after they had already shot several pieces, and some of them had already been captured and assembled. Almost all the video was shot 24p on a DVX-100 and captured at 29.97. I figured I wouldn’t try to get too fancy, and just kept editing that way since some work had already been done at 29.97. Then I exported an edited video for upload and I took a look at it. As I should have realized, it was full of interlacing! There are a lot of moves on still photos, and it was just unacceptable. So I decided to try something I’d never done before. I took a piece that was edited as regular old 29.97 and converted it to 23.98.

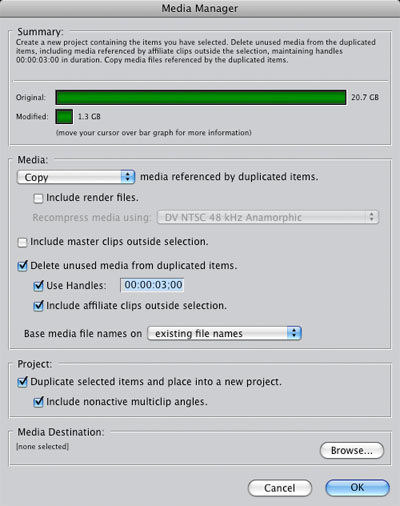
First I media managed everything, so I could always go back if I screwed it up. I made a new project copying only the linked media, with 3 second handles. The handles were very important, because without them I couldn’t properly remove the pulldown on some clips. There needs to be a little bit of leeway at the beginning and end of the clip, since there will be some frames removed.

Once I had my newly created project, I selected all the DV NTSC master clips in the bin and clicked on “Tools/Cinema Tools Reverse Telecine.” Cinema Tools went to work on all the clips, and automatically removed the 2:3 pulldown.

Now I had 23.98 media in a 29.97 sequence, all of which was informing me of a newfound desire to be rendered. So I hit ⌘ + A to select all the clips in the sequence, copied to the clipboard, created a new 23.98 sequence, and pasted into the new sequence. Now I had 24p clips in a 24p sequence, with no need to be rendered. The trouble of course, was thanks to the removal of 6 available frames per second, some of the clips were now off by a frame. Some were even out of sync, but they were nice enough to tell me that. I had to go through manually and make sure everything fit together properly. Since the pieces were only about 3 min long it wasn’t too odious. Every once in a while I had to slide a clip 1 frame forward or back.

Once I was satisfied that I had a sequence that matched my original cut, I exported a fully progressive QT. The moves on the artwork are significantly better now, and there is no interlacing to be found.

Famous!

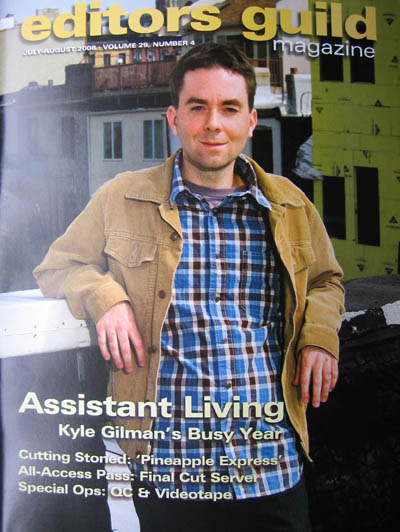
I did an interview with Rob Feld for Editors Guild Magazine a couple months ago, and had my picture taken by John Clifford on my lovely Brooklyn roof about a month ago. Today I got a copy of the July/August issue and there’s a big picture of me on the cover looking squinty yet casual.


Sorry for the bad quality, I don’t have a scanner and it’s not online yet. Also, note that Pineapple Express didn’t get the cover photo. Someone at the magazine has a warped sense of priority.

The article is quite extensive and I’ve definitely been paraphrased and edited for brevity. I just hope I don’t come off like a jerk.

OpenCut Final Cut


Here’s the final cut of my OpenCut project. Go to Vimeo to see it in 720p HD. This was a very fun experience. I learned a lot about the Red workflow. It turns out at this point it’s about as easy to use as P2 media. I’m still a little unsure about how I would finish it on a large budget project. I’m perfectly content to finish the project in 2K ProRes, but given the option I know it would be better to do a 4K assembly and color correct from the original files.

It was very unusual for me to work on a script I disliked and have the opportunity to change it beyond what any director would let me. Since I had no contact with the writer/director on this project, it didn’t matter that I thought his script was trite and boring. I wasn’t collaborating with him, I was stealing his footage. The downside of the isolation from the production was that I had nobody to yell at when crucial shots were missed or delivered without sound. I only received one take that had blood on the wall after the gunshot and it was MOS. I used it, but I would have liked some better options. There were several shots covering the end of that scene that included the ear and wall without the blood, but I didn’t use them because the blood would have disappeared. And I didn’t get a lined script, which would have been nice.

I tried using Color to do the color correction, but even as I started to get the hang of it I realized that it was way more control than I needed or had the ability to take advantage of. So I stuck with good old 3-Way Color Corrector in FCP. And I mixed in FCP too. What can I say? I stick with what works.

OpenCut First Cut

This past week I’ve worked a bit on my version of the OpenCut 1.0 project. As I said earlier, I did not care for the script, so I decided to make a few important changes to the tone. I’ve finished up my initial cut, and done a bit of sound work. I’ll probably polish the edit when I’m back from Amsterdam, and do some color correction. I’m hoping to learn how to use Apple’s Color program with this project.

You can see the cut below, or go to Vimeo to watch it in 720p HD.

“Susannah” 06-09-08 from Kyle Gilman on Vimeo.

Red TC Fixer

Scott Simmons at The Editblog has noticed a serious problem in the Red post workflow. There are two timecode tracks in R3D and their associated QT proxy files. One is known as “edge code” and is generated as rec run. It is continuous from the end of one shot to the beginning of the next. The other track is time of day. If your camera is set up to display edge code during shooting, QT will display edge code. If it’s displaying TOD, QT will display TOD.

I did some peeking under the hood, and it seems that the QT proxy files generated by the camera have two timecode tracks. The first track is whatever was displayed during shooting. If you delete Timecode Track 1, QT will now display the other type of timecode. If edge code was turned on in your clip and you delete Track 1, you’ll see TOD.

Unfortunately, right now it looks like there are a number of applications that are only looking at the TOD, so if you’re going to do an assembly it seems to make sense to work in TOD. If your production wasn’t aware of this problem and had edge code display turned on in camera, and you still want to work with proxies, I’ve made an AppleScript to delete the first TC track for all the QuickTime files in any directory and its subdirectories. Use with extreme caution. The script will permanently delete the first TC track from any QT file in its path. If you want the track back you have to regenerate the proxy files. I’ve done limited testing with this, and I’ve never worked with AppleScript before, so please be careful.

Download “RemoveTCTrack” 0.1

OpenCut Begins

Right now I’m participating in the first “OpenCut” project, which is a great idea unfortunately saddled with an awful script. Basically some very clever people came up with a great way to give people access to footage shot with the exciting new Red One camera. I’ve been following the development of the camera and went to NAB NY last year to see some 4K Red footage projected. It was very pretty. But I haven’t worked with any producers or directors crazy enough to try it out on a film yet. There are definitely still a lot of limitations and a lot of bugs to be worked out, but the promise of the system is incredible.

So the OpenCut people shot a short film on the Red One and they’re giving the footage to anyone who pays the very reasonable $25 fee. I just got my hard drive in the mail today and I’m currently transcoding everything into ProRes HQ and syncing up the audio.

Here’s why ProRes HQ. You see, Red shoots in a kind of RAW format, like digital still cameras can do. It retains metadata regarding exposure and whatnot, but you can adjust that after it’s shot. It’s all very fancy, but I don’t want to spend my time grading the image before I edit. You end up wasting a lot of time on footage that you won’t use. That’s why you do a quick one-light telecine when you’re working on film. I just want to start working on the footage as soon as possible. You can’t edit straight from the “RAW” (actually .r3d) files, but the camera automatically generates QT reference (proxy) files of various resolutions. You can edit using those proxies, but it requires access to the original r3d files and a lot of processing power. My quad-core 3 gHz processor is around 90% on all cores while playing back one of those files. I can add some real-time effects in there too, but it makes me uneasy. So I’m going with something I know. I know ProRes HQ is great, and my processor barely breaks a sweat once it’s transcoded.

I’m doing the transcoding using the Red Log and Transfer Plugin, which works just like those old-fashioned P2 cards. You open up the original folders and start transcoding the clips you want. FCP creates a master clip and generates the new media on your scratch disk. I noodled around with RedAlert, which seemed nice, but had more controls than I wanted, and I tried RedCine, which was completely baffling, and usually froze up on me. I never even managed to figure out how to export a clip (UPDATE: Hit the big red “Go” button). The Log and Transfer Plugin is definitely the simple way to go.

I’ve looked at some of the footage, and I started syncing the audio. For some reason it was recorded at 44.1 kHz, so I have to be careful to change my sequence settings to match. There are no scene numbers either, which I guess makes sense for such a short film and for a project that will be edited by different people in presumably wildly different ways, but it threw me a bit. Every shot is assigned a number, although luckily it’s not in shooting order like they do in the foreign lands (a confusing system obviously not designed by an editor). It’s in order based on the script / storyboards as far as I can tell.

As for the script, the less said about it the better. I’m going to do my best to turn the movie into something completely different.

Editing La Commedia – Part 2

I’m back from Amsterdam and we’ve finished editing La Commedia. A few weeks ago I described the basic setup we were working with. The whole thing worked beautifully. We almost never rendered anything. There were times when playing back a freeze frame while 2 other video streams were running would cause dropped frames, but that just required a quick render on the 8-core Mac Pro we were working on. The finale of the show finally uses all 5 screens at once in a seizure-inducing extravaganza that also included some effects, so that needed rendering as well. But for the majority of the show I was able to edit up to 4 streams of resized HD video in realtime.

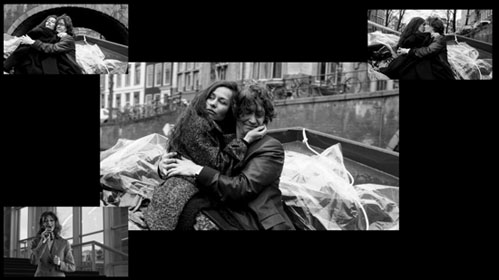
This is an example of the format we used during editing. Each picture represents one of the 5 screens that will be in various locations throughout the theater. The “C” screen is not in use in this example.

The real difficulty in this project was creative. The opera doesn’t really have a clear narrative like a traditional opera. It’s more fragments of ideas that all relate to a theme. Hal Hartley, the director of the show, came up with a separate story for the film that was inspired by the ideas in the opera. But while there’s a clear relationship between the two, the film is definitely not just an illustration of what the people are singing about on stage. And I usually had no idea what anyone was singing about anyway since we edited to MIDI recordings of the score.

As we started editing there were a lot more decisions to be made than usual. In a movie you can take for granted the fact that you’re going to have an image on screen most of the time. You might have a few seconds of black here and there, but in general movies tend to have something going on all the time. But with a stage production, you might not have any video at all for several minutes while the audience focuses on some activity on the stage. And if we do want to show some video, we have 5 different screens to choose from. And some portions of the audience can’t see some of the screens. Some of the audience sees the back side of some of the screens, so the image is in reverse and we can’t put text on those screens. It was all very tricky. Read more

Avid Xpress Pro: Good Riddance

Ever since Media Composer was released as a software-only option (no longer requiring expensive Avid hardware) I’ve had a hard time understanding why it cost so much more than Xpress Pro, considering the complete compatibility between them, and the large overlap in features. I didn’t see much need to upgrade to Media Composer myself. Well, apparently Avid is done with Xpress Pro, and they’re slashing the price of Media Composer. I think this is a great move. It puts Media Composer much closer to the price of Final Cut Studio, and removes the vestigial Xpress Pro line. It’s getting so cheap, I might even buy a Mojo some day.

Film & FCP

Film lists. Like film itself, they are on the way out. When we did Lake City we shot on super-16mm and transferred all of the negatives to HDCAM-SR with 10-bit log color. We edited with downconverted DVCAM tapes, then did an online using timecode. Since it was edited on an Avid, and I used ALEs from the lab to batch capture the DVCAMs, keycode was also tracked automatically. It was good to have around, in case for some reason we had to re-transfer something from s16, but in the end the HDCAM-SR tapes were our master tapes. And obviously if you originate in HD you don’t have any film to track. So believe it or not, in all the modestly budgeted films I’ve worked on, I’ve never had to deal with film lists before.

There are still some times when you need to track film. If you shoot 35mm, you might cut negative and make a print the old-fashioned way without a DI. In that case you’re going to be using keycode like crazy. You’ll probably conform a workprint before you cut your negatives too. Or if you shoot 35mm and do a DI, you’ll benefit from the increased resolution of 2K and 4K. At the moment it is not cost-effective to scan in all your dailies at 2K, and certainly not at 4K. So in that case your DI facility will have to scan the negatives from a film list that you generate.

But I’ve recently been working on a movie shot on s16 and transferred straight to DVCAM. It was then edited in FCP. I was not involved in the project until they brought me in at the hand-off to the sound editors when it became clear that there were problems. Final Cut Pro is a great piece of editing software, but it’s so flexible that if you don’t know exactly what you’re doing, you can get in trouble fast.

The first problem is working with film shot at 24 fps and telecined at 23.98, and trying to synchronize it with BWFs (Broadcast WAV files, which are WAV files with timecode) from a digital sound recorder. One way to avoid this hassle is to conform all the video to 24.0 fps using Cinema Tools. But it’s really best not to do that. Sound editors don’t like it, and you’ll have some trouble viewing on an external NTSC monitor or outputting to tape. It’s best to keep everything at “video speed.” Read more