OpenCut Begins

Right now I’m participating in the first “OpenCut” project, which is a great idea unfortunately saddled with an awful script. Basically some very clever people came up with a great way to give people access to footage shot with the exciting new Red One camera. I’ve been following the development of the camera and went to NAB NY last year to see some 4K Red footage projected. It was very pretty. But I haven’t worked with any producers or directors crazy enough to try it out on a film yet. There are definitely still a lot of limitations and a lot of bugs to be worked out, but the promise of the system is incredible.

So the OpenCut people shot a short film on the Red One and they’re giving the footage to anyone who pays the very reasonable $25 fee. I just got my hard drive in the mail today and I’m currently transcoding everything into ProRes HQ and syncing up the audio.

Here’s why ProRes HQ. You see, Red shoots in a kind of RAW format, like digital still cameras can do. It retains metadata regarding exposure and whatnot, but you can adjust that after it’s shot. It’s all very fancy, but I don’t want to spend my time grading the image before I edit. You end up wasting a lot of time on footage that you won’t use. That’s why you do a quick one-light telecine when you’re working on film. I just want to start working on the footage as soon as possible. You can’t edit straight from the “RAW” (actually .r3d) files, but the camera automatically generates QT reference (proxy) files of various resolutions. You can edit using those proxies, but it requires access to the original r3d files and a lot of processing power. My quad-core 3 gHz processor is around 90% on all cores while playing back one of those files. I can add some real-time effects in there too, but it makes me uneasy. So I’m going with something I know. I know ProRes HQ is great, and my processor barely breaks a sweat once it’s transcoded.

I’m doing the transcoding using the Red Log and Transfer Plugin, which works just like those old-fashioned P2 cards. You open up the original folders and start transcoding the clips you want. FCP creates a master clip and generates the new media on your scratch disk. I noodled around with RedAlert, which seemed nice, but had more controls than I wanted, and I tried RedCine, which was completely baffling, and usually froze up on me. I never even managed to figure out how to export a clip (UPDATE: Hit the big red “Go” button). The Log and Transfer Plugin is definitely the simple way to go.

I’ve looked at some of the footage, and I started syncing the audio. For some reason it was recorded at 44.1 kHz, so I have to be careful to change my sequence settings to match. There are no scene numbers either, which I guess makes sense for such a short film and for a project that will be edited by different people in presumably wildly different ways, but it threw me a bit. Every shot is assigned a number, although luckily it’s not in shooting order like they do in the foreign lands (a confusing system obviously not designed by an editor). It’s in order based on the script / storyboards as far as I can tell.

As for the script, the less said about it the better. I’m going to do my best to turn the movie into something completely different.

IMDb Theaters

I got an email last night from Withoutabox, a fantastic service for people submitting to film festivals. For some reason I got bored with submitting to film festivals right around the time video on the web started getting popular. Maybe it’s because I can get my short film seen by thousands and thousands of people without paying any money, while a film festival can show my short to dozens or half-dozens of people for a $35 submission fee. So I haven’t used Withoutabox in a few years.

The email I got was about Withoutabox’s new deal with IMDb. They were purchased by the IMDb/Amazon conglomerate earlier this year, and their first visible joint initiative is something they’re calling “IMDb Theaters.” Supposedly any film you have in the Withoutabox database that matches an IMDb entry is eligible. In my case, only one of four seems to be eligible at the moment, probably because they have a length limit. I would like to upload a clip or a trailer for the other three that exceed the length limit, but I don’t have the option yet.

I did upload all of Getting Laid Tonight. It’s great seeing the thumbnail on the actual IMDb page.

Editing La Commedia – Part 2

I’m back from Amsterdam and we’ve finished editing La Commedia. A few weeks ago I described the basic setup we were working with. The whole thing worked beautifully. We almost never rendered anything. There were times when playing back a freeze frame while 2 other video streams were running would cause dropped frames, but that just required a quick render on the 8-core Mac Pro we were working on. The finale of the show finally uses all 5 screens at once in a seizure-inducing extravaganza that also included some effects, so that needed rendering as well. But for the majority of the show I was able to edit up to 4 streams of resized HD video in realtime.

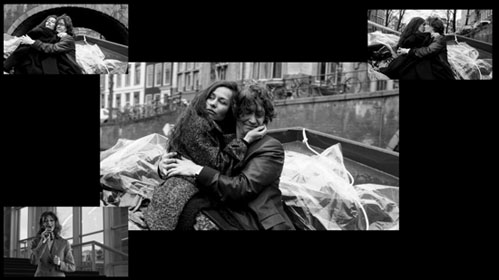
This is an example of the format we used during editing. Each picture represents one of the 5 screens that will be in various locations throughout the theater. The “C” screen is not in use in this example.

The real difficulty in this project was creative. The opera doesn’t really have a clear narrative like a traditional opera. It’s more fragments of ideas that all relate to a theme. Hal Hartley, the director of the show, came up with a separate story for the film that was inspired by the ideas in the opera. But while there’s a clear relationship between the two, the film is definitely not just an illustration of what the people are singing about on stage. And I usually had no idea what anyone was singing about anyway since we edited to MIDI recordings of the score.

As we started editing there were a lot more decisions to be made than usual. In a movie you can take for granted the fact that you’re going to have an image on screen most of the time. You might have a few seconds of black here and there, but in general movies tend to have something going on all the time. But with a stage production, you might not have any video at all for several minutes while the audience focuses on some activity on the stage. And if we do want to show some video, we have 5 different screens to choose from. And some portions of the audience can’t see some of the screens. Some of the audience sees the back side of some of the screens, so the image is in reverse and we can’t put text on those screens. It was all very tricky. Read more

Lip Sync

I made a lot of progress on my animation project recently. The biggest breakthrough came from Aharon Rabinowitz’s tutorial on Lip-Syncing for Character Animation over at Creative Cow. I highly recommend it. I’m using his time remap method for lip sync and eye movement. It’s really helped me understand how this project can be done as quickly as I had originally hoped. I should be able to create a whole scene from multiple angles and only do the lip sync once. I’ll just use the same frames for each mouth position for every angle (straight-on, profile, etc) and copy and paste keyframes to each one.

Here’s my first test. It’s a line of dialog from the first episode. I did an arbitrary camera move and put Jennie in front of a background so I can start figuring out how those things work. I finally figured out that increasing the aperture size of an After Effects camera is a quick way to ensure the low depth of field I was looking for.

[qt:https://www.kylegilman.net/videos/JennieLipSyncWeb.mov 500 297]

Watch it in HD at Vimeo

There’s definitely an Uncanny Valley effect going on here. Since it’s so close to looking like a real person, I think it is guaranteed to look a little creepy no matter what I do. But I’m going to work with that, not against it.