
Film & FCP
Film lists. Like film itself, they are on the way out. When we did Lake City we shot on super-16mm and transferred all of the negatives to HDCAM-SR with 10-bit log color. We edited with downconverted DVCAM tapes, then did an online using timecode. Since it was edited on an Avid, and I used ALEs from the lab to batch capture the DVCAMs, keycode was also tracked automatically. It was good to have around, in case for some reason we had to re-transfer something from s16, but in the end the HDCAM-SR tapes were our master tapes. And obviously if you originate in HD you don’t have any film to track. So believe it or not, in all the modestly budgeted films I’ve worked on, I’ve never had to deal with film lists before.
There are still some times when you need to track film. If you shoot 35mm, you might cut negative and make a print the old-fashioned way without a DI. In that case you’re going to be using keycode like crazy. You’ll probably conform a workprint before you cut your negatives too. Or if you shoot 35mm and do a DI, you’ll benefit from the increased resolution of 2K and 4K. At the moment it is not cost-effective to scan in all your dailies at 2K, and certainly not at 4K. So in that case your DI facility will have to scan the negatives from a film list that you generate.
But I’ve recently been working on a movie shot on s16 and transferred straight to DVCAM. It was then edited in FCP. I was not involved in the project until they brought me in at the hand-off to the sound editors when it became clear that there were problems. Final Cut Pro is a great piece of editing software, but it’s so flexible that if you don’t know exactly what you’re doing, you can get in trouble fast.
The first problem is working with film shot at 24 fps and telecined at 23.98, and trying to synchronize it with BWFs (Broadcast WAV files, which are WAV files with timecode) from a digital sound recorder. One way to avoid this hassle is to conform all the video to 24.0 fps using Cinema Tools. But it’s really best not to do that. Sound editors don’t like it, and you’ll have some trouble viewing on an external NTSC monitor or outputting to tape. It’s best to keep everything at “video speed.”
The easiest thing is to have the lab sync your dailies during telecine. But maybe you can’t afford that. So here’s the workflow. I think. I don’t actually have personal experience doing this, I’ve only figured it out for the benefit of other people. So your results may vary. Do a test before you get too far.
Ideally, record sound on-set at 29.97 NDF, 48048 Hz, but stamp it at 48000 Hz. Your sound guy should understand this. When you import the BWFs, FCP will automatically slow them down by .1% (allegedly)
If you’ve arrived at this page too late, and your sound is not recorded that way, it’s not too late for you. If you recorded straight up 48 kHz, you can re-stamp your sound using the BWF Restamp Tool which was designed for Avid editors, but will work for FCP too. It should go without saying that you should make a backup of your original sound files before messing around with them. I am told but haven’t done this myself, that you should restamp audio recorded at 48 kHz to 47952 Hz. Try importing that into FCP. If it’s still drifting out of sync, try using BWF2XML on those restamped files then try importing to FCP again. If that doesn’t work, experiment with the workflow a little. Try restamping at 48048. Sebsky Tools‘ BWF2QT is another option that might work.
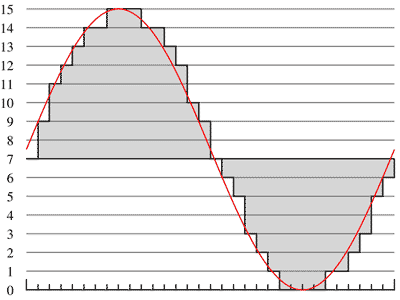 Let’s take another detour to understand better what’s happening with all this re-stamping business. When you convert the analog sound waves generated by the world into digital signals, they are sampled at a particular rate. Movie audio is generally sampled 48,000 times per second. So in any given second, the sound wave has 48,000 data points. The bit-depth of the audio (usually 16-bit, but increasingly 24-bit) determines the precision of that data point, or how much data is used to describe the amplitude of the wave. In the graph to the right, time is the x-axis, and amplitude is the y-axis. As you increase the number of points on the x-axis, the staircase effect will get smaller, and the digital audio (represented by the gray shape) will get closer to the smooth shape of the analog audio (represented by the red line).
Now, imagine that graph represents one second of your original sound recording. If, on set, there were 48048 marks made along the x-axis, but FCP is told that there are really only 48000, FCP will only play 48000 of those samples in one second. 48 of them will be played after that second is over. So it takes .1% more time to play your sound than it did in real life. This is what you want.
If, on set, you recorded 48000 samples per second, but you tell FCP that you only recorded 47952 in a second, once again, 48 samples that were in a real-life second get played after the second is over. So again you have effectively slowed the audio down by .1%
Now, on to film lists. Final Cut Pro doesn’t do everything as automatically as Avid does. For reasons I don’t fully understand, Cinema Tools continues to exist as a separate application despite the obvious benefits of just absorbing it into Final Cut Pro. So when you make film lists, you’re actually using Cinema Tools. You can initiate most Cinema Tools actions from FCP, but FCP doesn’t do the database work.
The first step is to import the log files from your telecine session. You need to have these. Either FLX (flex) or ALE files are crucial for maintaining accurate data for all your clips. I prefer to use ALE files. In FCP, start by selecting File > Import > Cinema Tools Telecine Log… Hit the “New Database” button and create a new database for your film. Make sure you select the proper options for film standard, video TC rate, etc. Your options will depend on the project.
Once you’ve made the new database, choose the ALE file to import. If everything goes well, you will now have several offline clips in FCP, and a corresponding list of database entries in Cinema Tools. You’ll need to open up Cinema Tools and open the new database to see that list. Now, put those FCP clips into their own bin and batch capture them. An hour or so later, you now have 29.97 files. Select them all, and click Tools > Cinema Tools Reverse Telecine. Cinema Tools will magically remove the extra fields and you’ll be left with 23.98 fps progressive video. This takes a while too.
Now I’m not sure, because I’m still doing this workflow theoretically, but I believe at this point you should select all these clips and click Tools > Synchronize with Cinema Tools. Uncheck the “Add new records” field but keep “Auto connect” checked. This should connect your media files with the database entries. Once you’ve done that, open the database in Cinema Tools and double click on one of the records. You should see a window with the video on the left and the various pieces of metadata related to that entry on the right. Pick an arbitrary spot in the middle of the video and verify that the burn-in on the picture matches the keycode numbers on the right. If they don’t match, fix them, and click save. If you have to do that a lot, you have a real problem and should hire me at a reasonable weekly rate. You don’t have to check every clip, but do a spot check of a couple clips for every tape. If you’ve made any changes, select the clips you changed in FCP, and click Tools > Synchronize with Cinema Tools to update the data in FCP. If you don’t need to make any changes to the keycode, you can check it from FCP by turning on timecode overlays and turning on the check mark next to View > Timecode Overlays > Keycode.

Repeat these steps for every ALE you get. Put it all in the same database.
Now you’re free to edit, and forget that Cinema Tools even exists.
Months later, you’ve finished editing your movie and it’s time to go back to the film. Now select your sequence and click File > Export > Cinema Tools Film List. There are a lot of options here, and your negative cutter or DI Facility will tell you what you should choose. Chances are they will be upset that you edited in FCP, but it’s too late to turn back at this point. Make sure you select the right database. This will generate a PDF that you can read. Check a few shots on the list against the keycode overlay in your project. You might also need to export a Cinema Tools XML Film List. There are fewer options for that one.
Now, sit back and enjoy the riches that come so easily from an independent film.
Leave a Reply
Want to join the discussion?Feel free to contribute!